Friday, October 17, 2014

Ma.K Fledermaus Diorama - Cockpit Continued

Storage Compartment

I finished up prepping and painting all of the items that will go into the storage compartment behind the pilot's seat. You'll barely be able to see these items when the model is complete, so I didn't put a ton of time into them but I did want to have them there for flavor.


I also put a coat of primer on the sidewalls and ... cockpit middle thing with the seat and pedals and all. I'm sure that's what it's called.

I do love how a coat of primer just sucks all of the construction together visually. You really start to see all of the detail work beginning to come to life. Nothing like geeking out on primer.


Painting the cockpit interior is next. I'm going for the old "cockpit green with red knobs and silver things and wires and black parts and cool dials" look and feel. Check out the cockpit that Brett Green put together for this Spitfire. Awesome. This is my inspiration.

Submarine Spitfire Mk.IXc by Brett Green


Wednesday, October 8, 2014

Ma.K Fledermaus Diorama - Beginnings

The Bat

Well, so much for finishing the anglerfish sculpture before I let myself start on another scale model. I'll let my self off the hook this time, because the Ma.K Fledermaus was calling my name.

I've always loved the look of this 1/20 kit, with its spindly legs and big head/little body. I love how cramped the cockpit looks, like the pilot has to wriggle him/herself in like an Apollo astronaut. "Fledermaus" means "bat" in German. How cool of a name is that?

(C) Kow Yokoyama 1997

(C) Kow Yokoyama 1997

It's a great kit (despite being famous for some fit problems and some gaping holes into the interior of the kit), and I want to build an interesting diorama to frame it. This time I'm going to go for something more urban for the diorama; but first, the kit build.

Cockpit

Like I said, I like the idea of the cockpit being cramped and full of levers and dials and stuff, so I challenged myself to trick out the sparse cockpit.

I started in on the interior sidewalls, with lots of wire and little bits from my spares box. An old Testor 1/35 WWII motorcycle kit and an old 1/35 field tool kit proved especially useful for donor parts.


Given where I want to go with the story in the diorama, I also knew that I would need an open storage compartment somewhere, so I cut a hatch into the back of the cockpit, built a box behind it, and leaned the pilot's seat forward like you would in your Toyota Camry. I'll fill that compartment with various supplies for the pilot. In the shot below you can also see some sort of oxygen tank mounted above the pilot's left shoulder, made from an old miniature light bulb, a part from a guitar string, and a spare from the motorcycle kit. Fun stuff.


I also thought it would be cool to build a joystick, or whatever you call it - something like what you see in helicopters. Brass rod and Milliput did the trick.


Here are the pre-painted items to go into the storage compartment. A blanket, a water bottle, an MRE (meal ready to eat - made from super thin tin), some welding goggles (strap added with lead foil), and a few tools from the 1/35 field kit (they were too big for that scale anyway).


Man, I should clean my cutting mat. It looks like a flock of pigeons pooped all over it.

Wednesday, July 9, 2014

Anglerfish - In Progress 1

I've always had a thing for strange sea creatures. I have a particular affinity for deep sea oil rig remote submersible footage - where oil rig technicians send little remote controlled probes equipped with cameras down to deep sea pipelines and rigs to check things out or make repairs. Every once in a while one of these submersibles captures something crazy on their cameras. This makes my heart jump. Here are a few favorites.


I mean, come on. Who makes this stuff up?

I particularly love anglerfish - bizarre fish who live way deep down in the ocean where no sunlight reaches. They have a sort of fishing lure that extends off of their head that glows and wiggles, attracting smaller fish right up to the anglerfish's mouth. Clever.

I wanted to build one, and I wanted it to have lights.


The piece is built from brass and copper tubing and wire, soldered together at the joints.

I started this piece years ago, and it's time to finish it. I'll show you the base of the sculpture soon.

Monday, June 30, 2014

Fishing Lures

I'm in the process of finishing up the Ma.K Krote diorama, and thinking about what's next.

I decided that before I'll let myself dive into another scale model project (Ma.K Fledermaus is on deck), I would complete a different project that I've been working on lazily here and there for the last few years.

More soon.


Sunday, June 29, 2014

Ma.K Krote Diorama - Model Build

Build-up

The build of the Krote itself was nothing fancy. I built it according to the instructions and didn't go into any extra detailing as the details of the kit are wonderful. Plus since this was my first kit in 20 years, I didn't want to push my luck too far.

I did wire a white LED into the search light, though, because ... I'm a sucker for miniature lighting. And kittens.

Once all seams looked good, I primed the model.


Hairspray and Salt

I knew that I wanted to try out a few of the newer sweet weathering techniques that had emerged during my time away from the hobby. Hairspray and salt were at the top of my list.

LEARNING - Here's what I learned about hairspray and salt, after fully painting my Krote ... twice. This may not be how you do it, but after a pretty good FAIL on my first attempt, this is what worked for me.
  1. Apply the rust or other colored undercoat. I used Tamiya Hull Red, which worked fine, but I think next time I'll use something a little less red and a little darker. Put on 2-3 coats, and then seal it with matte sealer. I used Tamiya Matte Sealer out of a can
  2. Hit the hairspray. I found that the coating shouldn't be too light and not too heavy, and that spraying it from the can rather than through my airbrush worked well. I just went for "wet," and this worked
  3. Hit the salt. I went sparingly with the salt. I love weathering, but I don't love overdone weathering. I mixed coarse kosher salt with finer grain table salt and this gave me a good variety of flakes. After I sprinkled the salt onto the wet hairspray, I hit the model again with another light coat of hairspray
  4. Apply the overcoat. I went for a simple camouflage scheme that I made up on the spot from Tamiya Acrylic German Gray and Light Sea Gray
  5. Get to scrubbin'. Run the model under warm water and start scrubbing oh so gently with a paintbrush, a cloth, a scouring pad, whatever you find works well. Start slooooow and work your way up. Overdone comes on quick
  6. Seal it again so that it's ready for weathering


This is an awesome technique that works like a charm.

From there I applied simple oil washes of dark brown and black to pull out surface detail. I then added another wash of raw sienna oil paint and Turpenoid to certain areas to give the Krote an overall slightly rusted look - again, not too much.

For the engine, gun, and other metallic internals I base coated in Tamiya Gunmetal and Black, and then washed certain components with lighter colors for variety. Once dry I applied the same raw sienna rust wash, and then rubbed ground graphite onto these parts with my finger, which gives it a really cool ... enginey look.


Ma.K Krote Diorama - Base and Figure

Planning

I knew I wanted to build a diorama to bring the Krote to life. I wanted the diorama to tell some sort of story, and what eventually came to me was a simple story of the Krote stomping down a rural road, while a resistance fighter, wearing tattered clothes and armed with some sort of stolen weapon, lay in waiting underneath the road, hidden in an irrigation pipe, waiting until the enemy Krote strides past on its patrol, waiting to emerge from hiding and fire off his one shot to take the Krote down. Tom Joad with an RPG.

I sketched out the diorama on paper and bought a wooden base at Michaels.


Tom Joad with an RPG

I made the irrigation pipe from PVC tubing, cutting off the bottom 1/6 or so of the tube with a jigsaw so that it would lay flat on the base and cut down on the height of the finished diorama. I coated any areas that would be exposed with a mixture of Tamiya acrylic gray paint and baking soda to give it a grainy, cement-like texture.

For the resistance fighter, I modified the figure that came with the Krote kit. I used the typical technique of cutting the limbs apart at the joints, adding in wire and repositioning the figure to the pose that I wanted, filling gaps and resculpting clothes with Milliput. For Tom's weapon, I wanted him to have an old-school looking RPG - a subtle contrast to the more advanced weapon of the Krote. I wanted Tom to be all 80's "Wolverines" in his weaponry.

So I looked up some reference material on the internet for RPGs and built one up from brass tubing, Milliput, styrene, and bits from other model kits.


Once I had the figure and weapon together, I mounted him on a sheet of thick styrene that I had cut to slide into the PVC irrigation pipe. I then textured the surface of the styrene sheet with Celluclay, sand, pebbles, and dry crushed basil leaves. I painted the base and then slid it into the PVC pipe and glued it down.


Man-in-a-Tube

Once I had this sweet little man-in-a-tube put together, I installed it on the wooden base. I knew that I wanted the Krote to be walking down the road, which meant that it would need to have one foot lifted up into the air, which meant that the model would have to be well supported on only one foot. So, I installed a piece of brass tubing in the base before covering the irrigation pipe with foam and groundwork. I surrounded the tubing with Milliput to make it extra strong. A piece of brass rod extending from inside the Krote's leg and down through its foot would then slide right into the tubing, making for a nice sturdy tie-down.

Florists Foam

I built up the surrounding terrain with a fine-grain green florist's foam, which I may or may not use again. LEARNING - This particular foam is really nice to shape and carve, but it leaves an incredible amount of plastic foam dust everywhere, which I can only imagine is not so great to breathe.

I pressed and then hot glued small rounded stones from the driveway into the foam where I wanted some larger exposed rocks once the groundwork was applied, and I built a retaining wall on one side of the ravine from balsa wood. LEARNING - Next time I'll use basswood or another harder wood rather than balsa wood. Balsa is super easy to carve and cut, but to me it doesn't have a realistic scale grain.


Ground Texture

From there, ground texture was added with a mixture of Celluclay, wood glue, water, cheap brown acrylic paint, and sand and small pebbles. I like to go with a thin, wet layer of Celluclay so that I can really sculpt the groundwork - think the consistency of icing on a cake. Once I had it applied, I sprinkled on more sand and pebbles here and there.

Scale Tin Cans

I take my daughter down to the creek a lot, and we often pull garbage and detritus out of the water that has washed downstream or sat on the creek bottom for years. I wanted to add such a detail to the dry creek bed. I remembered an old article in Fine Scale Modeler describing how to make scale tin cans out of heavy tin foil, so I made one. I love these kinds of details.


The simple technique is to flatten out some heavy kitchen tin foil, cut it with a new X-acto blade to the right width for the scale tin can (adding in a bit of overlap to make a seam), then wrap the foil around a piece of brass tubing that is the right diameter for the scale. Once wrapped, carefully glue the seam with a bit of super glue. Let that cure, then run the X-acto around the brass tube where you want to cut the top and bottom of the tin can and slide off the tin can. Sharpen the inside edge of the piece of brass tubing with a file or Dremel and then use it to punch a lid and bottom for the can. Glue on the bottom, and then fray the edges of the top a bit to simulate the use of a can opener and then glue on the top. It took about 5 minutes to make this can - fun little project before work one morning.

I dented the can (use a light touch - it is tin foil) and painted it a rust color since it was too have been on the bottom of a creek bed for years and embedded it in the wet Celluclay along with some bits of wire and other debris.

Color and Grass

From there I applied different washes to the groundwork, and had a hell of a time getting it to look the way I wanted it to. Painting the groundwork just seemed to make it look ... painted. I used to be a big fan of drybrushing, but these days to me it often just doesn't look right. Pastels turned out to be the trick.

I applied a few layers of static grass as well as Woodland Scenics tall grasses, and then gave everything, especially the road, a good dusting with ground down earth-colored pastels. Love the effect, especially since you can carry the exact same dusting up onto the Krote to tie everything together really nicely and make it all part of the same dusty world. Once the pastel dust was applied, I ran my finger over the tops and points of rocks and smaller stones. The natural oil in my finger pulled just enough of the pastel off to show their tops.


LEARNING - I don't completely love the way that the Woodland Scenics tall grass came out. No fault of the product - it's my application. The way that I applied it, it has too much of the hair-plug look to it and it doesn't feel totally integrated with the surrounding grass. I think it's partially the colors of the tall grass - though I did apply a wash of greenish-brown to it to tone it down and connect it better to the short grass - but I still don't love it. Next time I want to experiment more with using a different tall grass color or an installation method that really ties it all together.

These two guys totally have it dialed in, with the look similar to what I'm going for. Love the work of these two guys.


Mailbox

To add to the rural feel, I wanted to build a mailbox. The idea was to use the mailbox to subtly hint that whatever was happening in the world, societal infrastructure was down. Tom and this Krote were part of a much bigger picture, where whoever this Krote represents has taken over, and the Tom Joads of the world were resorting to guerrilla warfare to stop them. So I built the mailbox with the front open, the flag up, and the inside now inhabited by a bird's nest. In other words, this mailbox has not been used for a while. Something is amiss.


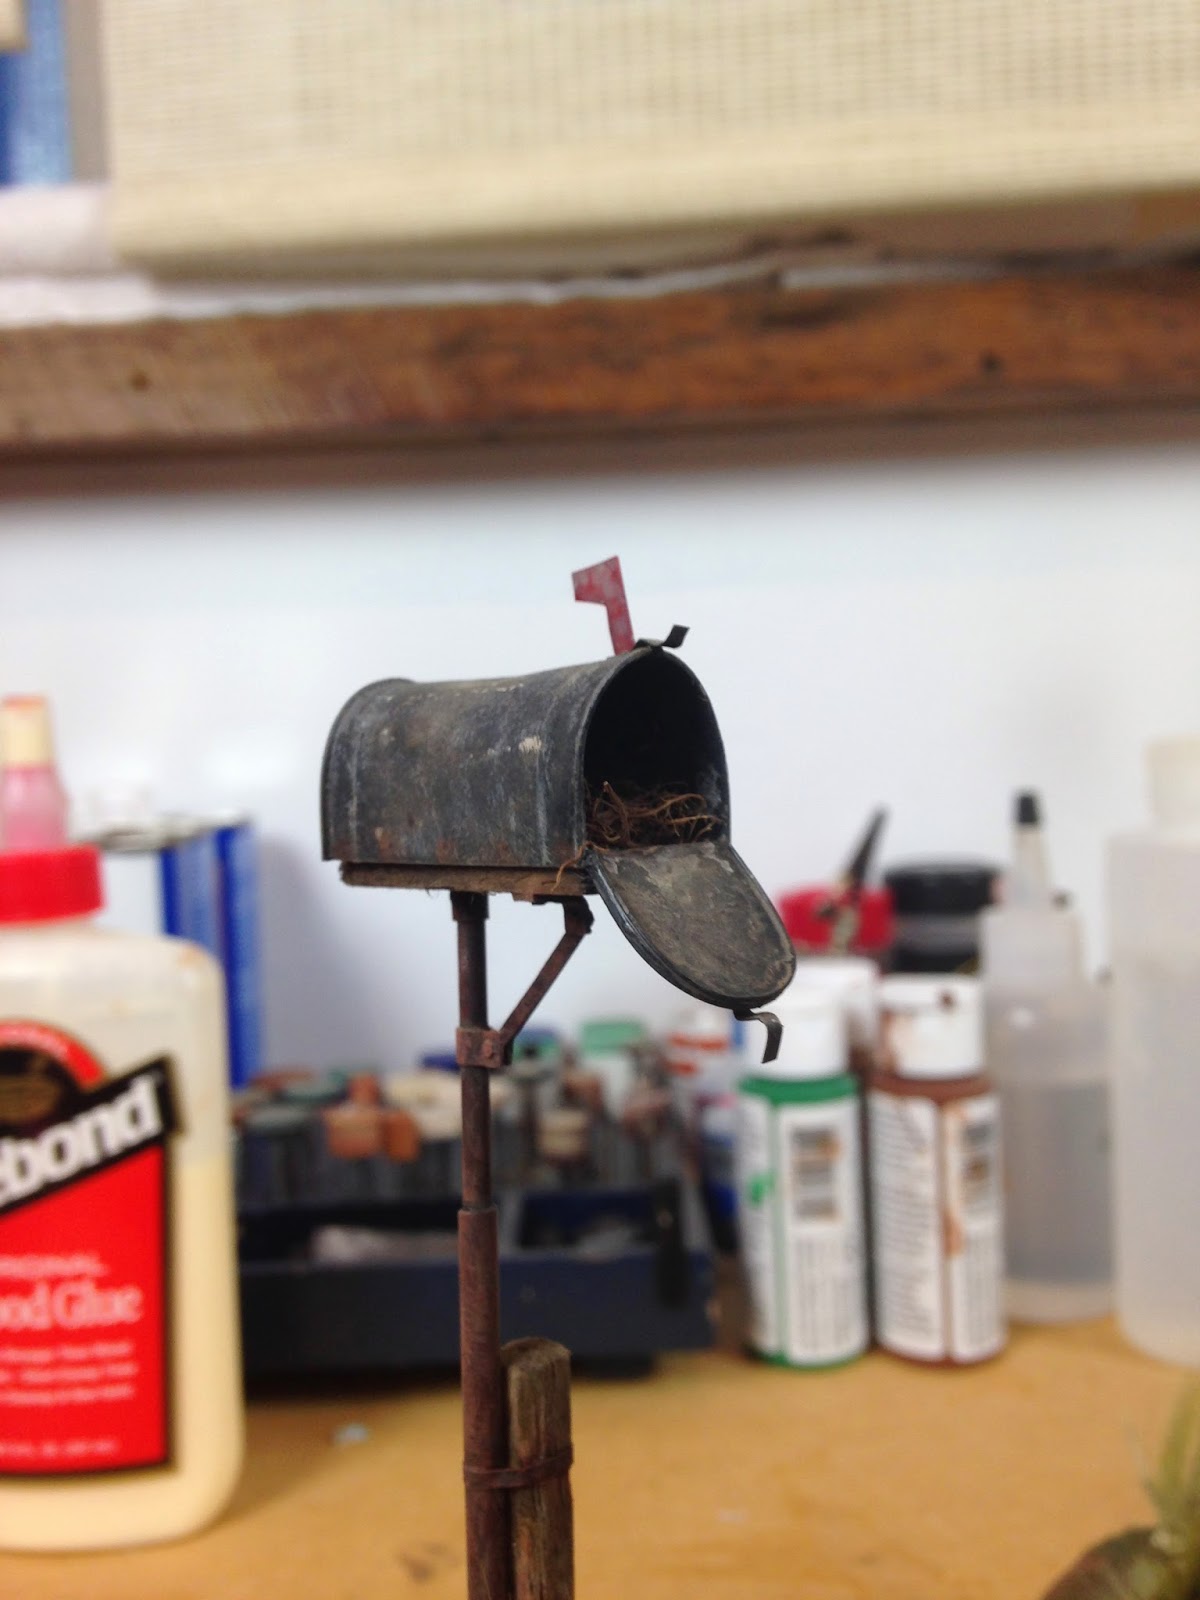
I built the mailbox from sheet styrene and the super-thin tin from the lid of a single-serving honey container that I picked up while traveling. The tin was the perfect material for the rounded barrel of the mailbox. I simply cut it to the right dimensions and then wrapped it half-way around a big piece of brass tubing. The great thing about this tin is that it dented just like the real thing - I just tapped it with the end of a metal file to make nice dents.

The base of the mailbox was made with brass tubing, styrene, and balsa wood. I made the bird's nest from a tangle of fine hair-like roots from some shrub or plant. I seriously think I've had those roots for over 20 years.

Like the rusty tin can, the mailbox is another nice detail to bring some life and a bit of story to the diorama.

Saturday, June 28, 2014

Roots

We'll skip the introductions and get right to it.

Heroes

I was a child of science fiction movies, and what I always loved the most about movies like Star Wars, aside from the great characters and hero's journey and all that jazz, was the world-building - the creatures, the ships, the gadgets, the environments, the textures and colors and sounds.

And the behind-the-scenes. I loved anything that I could get my hands on that described how the special effects magicians brought these worlds to life. I scoured book stores, comic book stores, and the cable channels for anything I could find that gave me even a glimpse of how in the world these people were making these things real.

My childhood heroes weren't ball players or movie stars - they were special effects pioneers and masters, beginning with the original Star Wars crew - the starting lineup of the nascent Industrial Light and Magic - Phil Tippett, John Johnston, John Dykstra, Dennis Muren, Ken Ralston, Richard Edlund, Lorne Peterson, and the model-master Steve Gawley. What a crew.

Tippett was always my favorite. He was one of the chief creature makers and stop motion artist and also had lots of personality in all of the videos that I saw of him. Cool guy. What an artist.

Then as Star Wars shifted the entire world of movies back to popularized science fiction and fantasy, the 80s kicked in, and a whole new slew of special effects wizards (some who had been around for years, and some who were new to the game) came into my world. Rob Bottin, Rick Baker, Kevin Yagher, Ron Cobb, Sid Mead, Ian Hunter and Matthew Gratzner, Stan Winston and all of the incredible artists who came out of his studio like Alec Gillis and Tom Woodruff. These guys were my idols.

I loved creature effects, and I loved models. Oh, the models. Such wonderful designs and pieces of ingenuous construction and detail.

I also grew up leafing daily through my tattered and well-loved copy of How to Build Dioramas by Sheperd Paine. His book was my bible for everything related to dioramas and scale model building. Such a talented guy and skilled teacher.

Enter Ma.K

When I was in high school, I found the Nitto line of science fiction scale models - what are now the Ma.K kits molded and distributed by Hasegawa. Designed by Japanese artist Kow Yokoyama, the kits were the coolest things I had ever seen outside of the Aliens Dropship and the Millennium Falcon. I bought a few and had a great time building them up, adding miniature lights, making little dioramas. Awesome kits, great designs.

Now 20-something years later, I've rediscovered how much I love building models. I've had a few of the Nitto kits in storage for the last 15 years or so, and the one that I decided to start with was always one of my favorite designs - the Krote. Reminiscent of the AT-ST glimpsed in Empire but with a far more WWII vibe to it, the Krote had great lines, awesome detail, and a wicked gun at its nose. I first saw the Krote in the Reader Gallery in the pages of Fine Scale Modeler. A dude had built a nice one and portrayed it trouncing through resin water with this great diorama base made from real stone slate.

So, a few months ago I pulled out my dusty Krote box and got to work. Now, as the first diorama that I've built in more than 20 years is almost complete, I'll backtrack to describe some of the nuances of the build, and more importantly, share some of the lessons I learned as I reenter this wonderful hobby.